
Here’s my quick HOWTO in pictures for wiring up a Fridgemate temperature controller. Keep in mind here that you’ll be working with 240V, so if you stuff it up you could die, burn down the house, or the world could blow up! You have been warned.

Figure 1: extention lead, fridgemate & probe, black UB1 zippy box, medium wire joiners (3 cut from a set of 12), grommets. Feet not shown. I think all the extras added up to about $15 from Dick Smith.

Figure 2: Cut the extention lead, cut two short lengths (shown below), remove some of the outher sheath, strip the ends of the wires, and twist the ends.

Figure 3: cut some short lengths. You’ll need to do this twice so you have enough short bits of wire to wire it up according to the diagram. Twist the ends of the wire so that the multiple thin copper cores are held together. You could even tin them if you have access to a solering iron, but this is not necessary. Just make sure that none of the thin copper cores are sticking out as this could possibly cause a short.

Figure 4: Cut space for the fridgemate, and file it back so it’s neat. I did this with a small hacksaw for the virtical cuts, then a stanley knife to score across horizontally, and then snapped the plastic along the score. Misjudged it a bit, and thus had to file down a couple of mm, which wasn’t that fun. 😉

Figure 5: Wire it up according to the diagram.

The wires slot into the back of the fridgemate. You will need to loosen each screw; as you do so you’ll see a metal bar lower down. You then poke the wire in above the bar and tighten the screw until the wire is held securely.

Figure 6: Put it all in the box. Note that I’ve cut some notches for the cables, same method as for the unit above, but much smaller and easier. The orange things on the side are slides that have serrated cynches underneath allowing you to cynch them up against the inside of the box, holding the fridgemate in place.
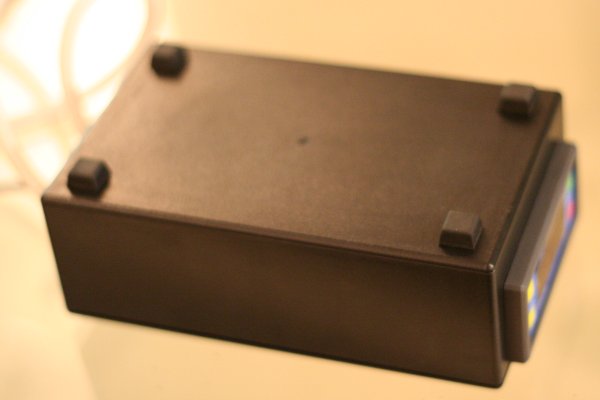
Figure 7. Screw it all shut, and I’ve added some self adhesive feet too! I’ll probably drill some cooling holes in the side of the box too.

Figure 8: Done! Current temperature, 27°C.
Enhancements:
Added cooling holes and strain relief. The strain relief was provided by adding grommets and knotting the cables [since doing this, genuine sparkies have said that they do this with cable ties done up tight on the inside of the grommets]. The slots were drilled lower so that the grommets would fit. Cooling holes were drilled above and below the cooling slots in the fridgemate unit itself. If you don’t have the rubber feet on the bottom, it would be worth drilling holes in the sides; I drilled holes in the top and bottom only.

Figrure 9: Enhancements in place.
That looks like a tidy job, the only comment I would make (from a sparkies point of view,) I would like to see some sort of cable anchor to secure the cables, to prevent the sheating from being pull outside of the case exposing single insulated cables, or causing stress on the terminal connections. this can be done quite simply with a couple of small cable ties zipped up tight about 10mm from the end of the sheath inside the box.
Looks good, however, I used a heavier duty Electrical cable, plus Clipsal Electrical plugs and joiners. Grommets and Case came from Jaycar. This worked out to be @ $17. Cable Ties I already have. The case is smaller so I had to mount it differently, and I used a jigsaw to cut the hole. It did come out a little messy due to the heat from the jigsaw
I like the ideas of the ventialtion holes, but worry about moisture getting in.
thanks for that skippy!!gives me confidence to do it myself.
anytime in Margaret River, do pop in for a taste!
cheers amita
Will be spensing 2 years down there from the start of next year with the uni – so i might take you up on that offer!
Great write up!
Cheers
Frank
Hi,
great write up – will be getting one for myself now that I have seen this, but I have one question. I sent a Q to Mashmaster and Frank pointed me in the direction of this Blog – I wanted to know a bit more about the temp prob that is supplied with the FridgeMate – how is is attached to you brew barrel and where – looking at the long stainless steel probe as well but wanted to know if the provided probe is sufficient to save my $$. Anyone got any insight?
Cheers
Marty
I just attach it to the outside of the wall of the fermenter, below the level of the beer, with a big glob of bluetac. The bluetac covers the whole probe, insulating it somewhat from the surrounding air.
The other option I’ve seen mentioned on forums is a hydrowell or whatever it’s called. This is a tube, closed on one end, that you insert the probe into, then insert the tube into the wort. Too complicated for me; I didn’t like the prospect of having to keep everything sanitised.
Hi,
So I take it from that the supplied probe is not immersible like the stainless steel probe that is a recommended extra on the mashmaster site?
Cheers
Marty
Correct. Unless you take further steps to seal it, of course.
Hi,
I now have my very own Fridgemate and have wired it up, but I have one question – the pictures above indicate that the brown should go into screws 1 & 2 from the left. The wiring diagram says that it should be in the 1st and 3rd slots from the left. Is there any difference, does this impact the preformance/operation of the Fridgemate at all? It all powers up ok etc but not sure if it is doing the right thing wrt to controlling the fridge – I connected to a light instead of a fridge and it didn’t turn it on when the work light was lit??
Cheers
Marty
That doesn’t sound right at all. Have a look at the wiring diagram in colour and you’ll see that the brown wires go into slots 1, 2 and 5, as in the photos above.
Thanks for directing me back to that – I didn’t think to check it as Frank had included a print out of what I thought was that very document. When I read this one and compared it against the one provided by Frank, I found that the one from Frank does specify slot 3. I will try slot 2 and let Frank know.
Cheers
Marty
Just an update:
A new model was shipped with an extra connection, copoint 3 on the relay side. Please disregard this and wire to points 1 and 2 as per previous instructions. The other points remain on the same layout except they have been renumbered because of the addition of point 3. Please email me if you have any questions or want a copy of the new instructions ask@mashmaster.com
Cheers
Frank
Hi thanks for the instructions, however I got lost on figure 5 sorry Im a complete dummy at this sort of stuff. Do you plug the fridge into the fridgemate somehow after its wired up ? In figure 2 and 5 from the pics it looks like both ends of the extension lead are wired into the fridgemate but obviously that cant be right. Could somebody please clarify this for me. My fridgemate is on its way here to me in the UK.
Hi Dave,
If you have a look at the wiring diagram you’ll see the answer:
fidgemate wiring diagram
In figure 5, the lead to the male plug (plugs into the wall) is on the right and the female (fridge plugs into), on the left.
The way the fridgemate works is as a switch between the wall and the fridge. When in cooling mode, it simply switches off the power to the fridge when its probe gets down to a certain temperature, thereby allowing you to control the set point anywhere between ambient and lowest temperature the fridge is capable of achieving. It also has some other smarts to prevent you from cycling the compressor too fast.
I’ll add the wiring diagram to the main article.
HTH,
Rob
That is a great help Rob,I am afraid I am very tool challenged
Screwy
Great comprehensive step by step photographs!
Much appreciated.
Cheers.
Thanks RWH, these were a huge help. Cheers – Dan
What a great set of instructions. Thankyou. Macbrewer
Awesome article, I just bought one of these and was thinking I would need a sparky to wire it up. Now I will do it myself, saved me $$$. Thanks
I followed these instructions and now I have a working FridgeMate! Thanks for this!
I’ve just purchased a DEI-105, and I’m wondering if you’re meant to use a similar setup – ie do you put the DEI-105 “in-line” using a cut extension cable? I’m confused because the wiring diagrom (see here…
http://mashmaster.com.au/UserFiles/2321-Files/File/Fridge%20Controller%20DEI%20105.pdf
…specifies a 25Amp switch connected directly to the compressor. This suggests to me that you have to connect the power output from the DEI directly onto the fridge somehow.
any comments?
Thanks very much for doing this blog. It was just the right level for me to get it working. I almost felt like a real man afterwards!!!
I have a fridgemate mkII and my electrician initially set it up. I want to change the temp but cant. I push the S button and it comes up with F1. In the instructions it says it should come up with the set point. Can someone take me through what to do step by step please. The temp is current 12 degrees and I wish for it to be 10.5 degrees
many thanks
Firstly, congrats on an excellent howto blog.
I have recently bought the FridgeMate after researching its wiring & assembly, but have noticed that there are some differences beween what is pictured above and the unit I have.
I noticed that the temperature probe pictured has a metallic sensor, and the two wires connecting it into the control unit are red and white.
From this I have two questions:
1) The sensor that came with my unit has a rounded plastic sensor ending- is that right? And
2) I have no colour distinction between the two ends which the NTC probe attaches to the control unit, even though the diagram shows red into #4 and white into #5.
Thus, can I wire the probe either way?
Thanks for your time in this.
Hi Sep,
It sounds to me like they’ve changed the temperature sensor component. Either that, or I sprung for the stainless probe… I don’t remember. Electronically, it appears that the probe is a thermistor:
http://www.aussiehomebrewer.com/forum/index.php?showtopic=39911
http://en.wikipedia.org/wiki/Thermistor
It shouldn’t matter which way you connect it, as it doesn’t have an orientation.
Cheers,
Rob
Hay Rob, have wired up a Fridgemate today and have a slight prob, we can’t get minimum temp to go above 20 degrees in F2 function setting. Have tried every thing from operating mode/ heat and cool, th lot, any suggestions ? Cheers Mick 😎
Hi Guys- I am trying t convert a regualr fridge intoa wine Fridge and was pointed to this blog by MashMaster. I haveve 2 Qs- Can i use the Fridgemate to control regular fridge temp at 13 deg celsius and is this any better to the plugin digital thermostats available out there http://www.ebay.com.au/itm/Digital-Temperature-Controller-Beer-Fermentation-Wired-Fridge-Freezer-Thermostat-/290829814525?pt=AU_Building_Materials&hash=item43b6cecafd
Thx
Ok, to answer your questions:
1. You can certainly use a fridgemate to make a regular fridge keep its internal temperature at 13 degrees (or any other temperature between ambient and the lowest temperature the fridge can produce).
2. The specifications of the fridgemate and that ebay listing look pretty similar to me, given a cursory glance at the specifications.
Very handy tips Rob! Many thanks….